Free Pattern 2 - Easy-Peasy Log Cabin throw/blanket
Free Pattern 2 - Easy-Peasy Log Cabin Throw/Blanket
This style of throw can be made in any yarn and to any size. It can also be crocheted.
1. For the best results use a stitch pattern which lies nice and flat (we use garter stitch here throughout, but moss stitch, seed stitch etc would work well. Just remember that stocking stitch will create curly edges which will need to be blocked at the end of the project.
2. For a subtle sophisticated outcome use toning shades as we have done, obviously the opposite applies if you want a brighter palette.
3. When ‘picking up’ along the ‘sides’ of the blocks use a ratio of approximately 3 to 4 rows when picking up along a row edge and a ratio of 1 to 1 sts when picking up along the longer stitch edge.
4. Stripe depth can be varied to get interesting effects, perhaps going from narrow stripes getting wider as the project grows or vice versa, or, depending on how many balls of colour you have available for your stripes, each stripe could be ‘striped’ perhaps with alternating 2 row stripes of 2 different colours. We kept the same stripe depth throughout.
5. It is fine to mix different types and textures of yarn as we have, and even different stitch types as long as the yarns or stitches knit to the same tension.
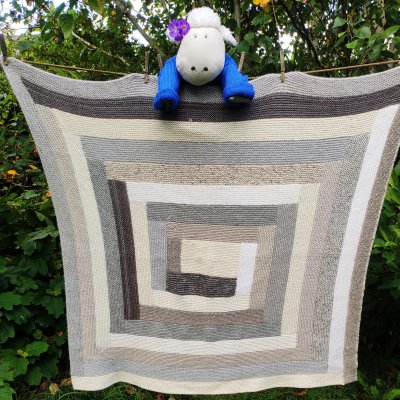
Our throw began with a cream garter stitch rectangle measuring 44 sts by 22 rows, which we will call A. All yarns used are aran weight.
So, with yarn A, cast on 44 sts and knit 22 rows plain. Cast off.
With yarn B, pick up stitches along a narrow ‘row’ edge of the yarn A rectangle, picking up approx. 3 sts to every 4 rows (17 /18 sts). If this distorts the edge slightly, pulling it in too much unpick and try a couple more stitches evenly distributed. Make a note of the ratio you have chosen. Knit 10 rows in garter stitch. Cast off.
With the stripe you have just added to the centre on your right hand side vertically, (narrow end up), pick up 8/9 stitches across the top of it in yarn C and continue to pick up every stitch (44 in our case) along the ‘long’ side of the centre rectangle. Knit 10 rows garter stitch. Cast off.
Turning work clockwise so the stripe you have just completed is vertical and on your right, with yarn D pick up 8/9 stitches across the narrow ‘row’ edge of the previously knitted stripe then pick up evenly along the short ‘row’ edge of the centre A rectangle (18-20 stitches) adjusting if necessary to keep work from bunching up or spreading out.
Knit 10 rows in garter stitch. Cast off. Turning work clockwise so the stripe you have just completed is vertical and on your right, with yarn E pick up 8/9 stitches across the narrow ‘row’ edge of the previously knitted stripe then pick up evenly stitch for stitch along the remaining long edge of the centre rectangle (44 sts) then another 8/9 stitches along the narrow edge of the first stripe (col B). Knit 10 rows in garter stitch. Cast off.
Continuing turning the work clockwise each time to pick up stitches (this makes an anti-clockwork stripe arrangement), continue until the throw/blanket is the size you want. Use as many colours as you want and if you run short consider combining yarns for a tweedy effect or using a finer yarn double. Darn in any ends if not already caught in (recommended).